Bumbleberry Papercrafts, Just Because Cards, Uncategorized

Just Because Card Using Altenew Paint-A-Flower: Daffodil Stamp Set!

Hello lovelies!
I have a simple card to share with you this week using the Altenew: Paint-A-Flower: Daffodil stamp set!
1
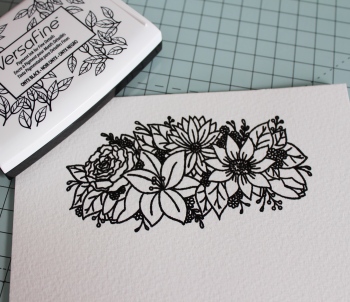
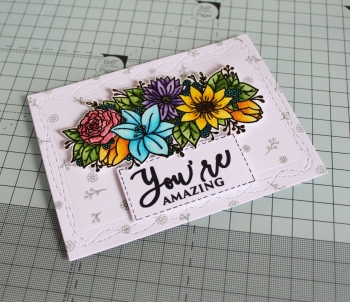
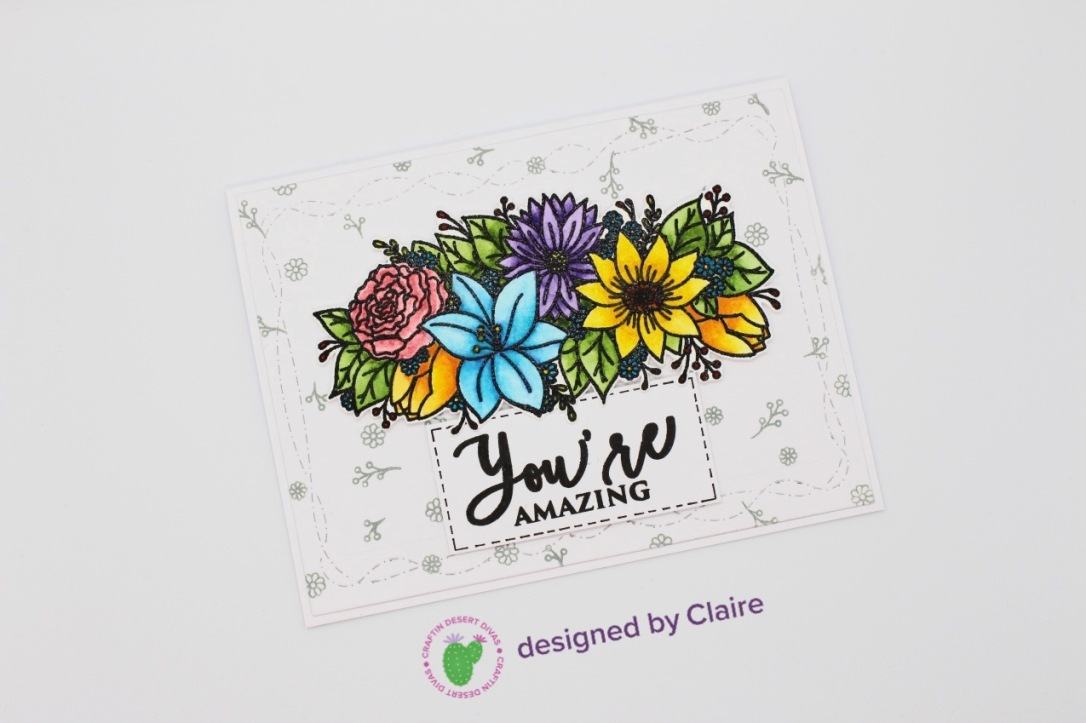
I stamped my images on watercolour paper using my Misti stamping tool and Gina K Amalgam Jet Black ink. I painted my images using the Altenew Watercolor 36 Pan Set, once they were dry I added some highlights with a white gel pen and fussy cut them out.
23
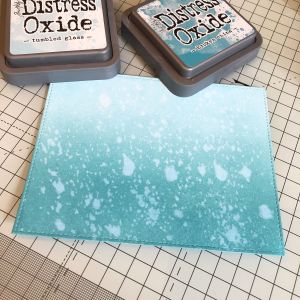
I used the Waffle Flower “Nesting Postage” dies to cut out two small panels from Neenah Classic Crest card stock. I used Worn Lipstick Distress Oxide Ink and the “Life Changing Blender Brushes” from Picket Fence Studios to blend ink on to the larger panel and distressed it with some water. I stamped my sentiment on the smaller white panel using Gina K Amalgam Jet Black ink and adhered both panels together using Scor-Tape. I used 3M Scotch Double Sided Foam Tape to pop my image up at the bottom.
456
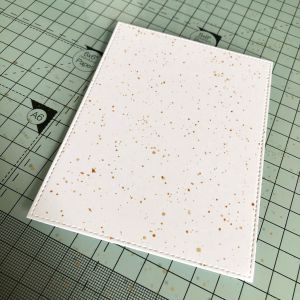
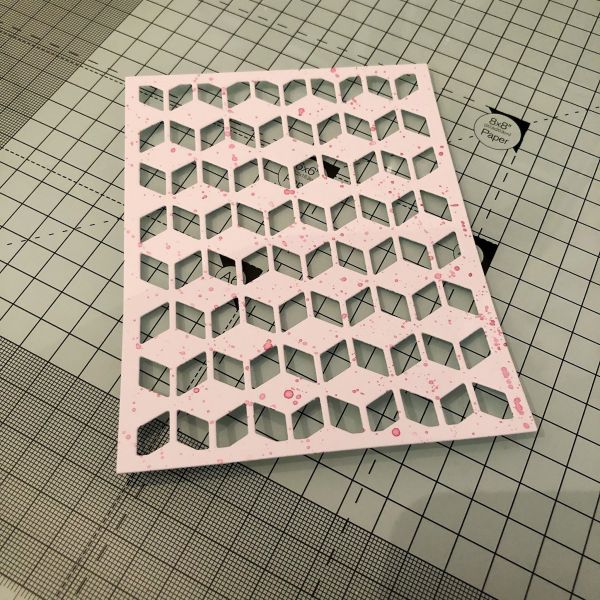
I cut a panel from black card stock and white card stock using Mama Elephant’s “Basic Rectangles” Creative Cuts and splattered the white panel with metallic gold watercolour paint. Once my splatter had dried I adhered both panels together using Scor-Tape, popped my image panel up using 3M Scotch Double Sided Foam Tape and adhered my panel to my card base.
P70 A Paint A Flower Daffodil
Thanks for reading lovelies! I’ll see you next week with another card.
Claire
xo

Bumbleberry Papercrafts
Shop

Stamps & Dies
Altenew “Paint-A-Flower: Daffodil” Stamp Set
Waffle Flower “Nesting Postage” Dies
Mama Elephant “Basic Rectangles” Creative Cuts

Inks
Gina K Amalgam Jet Black Ink
Worn Lipstick Distress Oxide Ink

Tools
Misti Stamping Tool

Paints
Altenew Watercolor 36 Pan Set

Adhesive
1/8″ Scor-Tape
3M Scotch Double Sided Foam Tape

Bumbleberry Papercrafts, Friendship Cards, Just Because Cards, Uncategorized

Thinking Of You Card Using Brutus Monroe “Rose Garden” Stamp!

Hello lovelies!
I’m back this week with a thoughtful card using Brutus Monroe’s “Rose Garden” stamp! Roses have a special meaning to me so I had to pick this one up!
12
I trimmed down some watercolour paper and put down some ink from my Distress Inks (the oxides will work for this too) in Fired Brick and Abandoned Coral on my glass crafting mat. I mixed them with a little water before also preparing my watercolour paper with water too, to allow the inks to move around easier. I painted both colours on in a random fashion and allowed them to blend together where they met, leaving some areas darker than others. As a last minute decision I added in some gold spots with metallic watercolour paints before scrunching up some clingfilm and covering the watercolour paper, moving the inks and paint around with my fingers through the film until I was happy with it. I set it aside to dry completely before removing the film, this creates different shapes and patterns for your background!
34
Once it had completely dried, I used my powder tool applicator to ensure embossing powder would only stick to where I stamped. I secured the paper in to my Misti stamping tool and stamped my image using Versamark ink. I coated the ink in Lawn Fawn’s White embossing powder and set with my heat tool. I used Mama Elephant’s “Basic Rectangles” Creative Cuts to cut a panel from the area I wanted and splattered it with some gold metallic watercolour paint to add some more texture and shine.
56
I trimmed a panel from black card stock slightly larger than the patterned panel before cutting a white panel and another black panel using the “Basic Rectangles” Creative Cuts once again to frame my patterned panel. I adhered all panels together using Scor-Tape. I stamped my sentiment from Altenew’s “Paint A Flower: Daffodil” stamp set using Gina K’s Amalgam Jet Black ink and trimmed it down in to a thin sentiment strip, framing that with some black card also. I popped my sentiment up on my panel using 3M Scotch Double Sided Foam Tape and adhered my panel to my card base.
P69 BM Rose Garden
Thanks for reading lovelies! I’ll see you next week with another card.
Claire
xo

Bumbleberry Papercrafts
Shop

Stamps & Dies
Brutus Monroe “Rose Garden” Stamp
Altenew “Paint-A-Flower: Daffodil” Stamp Set
Mama Elephant “Basic Rectangles” Creative Cuts

Inks
Gina K Amalgam Jet Black Ink

Embossing Powder
Lawn Fawn White Embossing Powder

Tools
Misti Stamping Tool
Embossing Magic Powder Tool

Adhesives
1/8″ Scor-Tape
3M Scotch Double Sided Foam Tape

Anniversary Cards, Birthday Cards, Friendship Cards, Uncategorized

Celebration Card Using Waffle Flower’s “Tiny Terrarium” Stamp Set!

Hey lovelies!
Today I’m sharing a celebration card using the “Tiny Terrarium” stamp set from Waffle Flower! I love the image from this set and knew I wanted to keep the rest of the card simple to let it really shine on it’s own.
12
I used my Misti stamping tool to stamp my image using Gina K’s Amalgam Jet Black ink and coloured it using my alcohol markers. I added some white highlights and details with a gel pen and fussy cut it out. I cut a panel from white card stock using the largest of Mama Elephant’s “Basic Rectangles” Creative Cuts and cut a window in the centre using Honey Bee Stamps’ “Double Stitched Polygons” Honey Cuts.
34
I cut another panel using the “Basic Rectangles” and ink blended on to it with Broken China and Tumbled Glass Distress Oxide Inks. I distressed it with my distress sprayer, let it sit for a moment before cleaning up the excess water. I adhered my window panel and backing panel together using Scor-Tape.
56
I secured my panel in my Misti to stamp my sentiment using Gina K’s Amalgam Jet Black ink. I adhered my image in the centre of the polygon window using 3M Scotch Double Sided Foam Tape before adhering my panel to my card base.
P34 WF Tiny Terrarium
Thanks for reading lovelies! I’ll see you next week with another card.
Claire
xo

Bumbleberry Papercrafts
Shop
Blog

Supplies

Stamps & Dies
Waffle Flower “Tiny Terrarium” Stamp Set
Mama Elephant “Basic Rectangles” Creative Cuts
Honey Bee Stamps’ “Double Stitched Polygons” Honey Cuts

Inks
Gina K Amalgam Jet Black Ink
Broken China Distress Oxide Ink
Tumbled Glass Distress Oxide Ink

Tools
Misti Stamping Tool

Adhesives
1/2″ Scor-Tape
3M Scotch Double Sided Foam Tape

Bumbleberry Papercrafts, Friendship Cards, Just Because Cards, Uncategorized

Friendship Card Using Mama Elephant’s “Heart In Bloom” Stamp Set! (With Matching Tags!)

Hello lovelies, Happy New Year!
I hope you’ve all had a fantastic time over the holidays and you’re settling in to 2019 quite nicely, today I wanted to share a friendship card and some matching tags I’ve made using the Mama Elephant “Heart In Bloom” stamp set! How beautiful is this floral stamp? I’m positively in love with it!
1.jpg2.jpg3.jpg
I started by stamping out the large floral heart with the banner in Memento Tuxedo Black ink and colouring it with my alcohol markers, I’m so used to colouring floral stamps with my watercolour paints it was refreshing to have a change! Once I had finished colouring I added some highlights and dotted details with a white gel pen and stamped my sentiment in the banner using Versafine Onyx Black ink. I fussy cut the heart out and moved on to my background.
4.jpg5.jpg6.jpg
I cut a panel using the Altenew “Cube Cover” die from white card stock and splattered it with pink metallic watercolour paint. I knew I wanted the colour within the negative space to be neutral as I wanted the floral heart to really pop, so I took Iced Spruce Distress Oxide Ink and smooshed it on my glass craft mat before spraying it with water. I took another panel of white card stock and placed it on the ink on my craft mat repeatedly, drying between layers until I was happy with the outcome. I cut it down to the same size as my die cut panel and adhered them together.
7.jpg
I popped my floral heart up on my panel using 3M Scotch Double Sided Foam Tape and adhered it to my card base. I finished my card off with some Bottle Green Nuvo Crystal Drops before leaving it in a safe place for them to dry for 24 hours.
P12 ME Heart In Bloom
For my matching tags I just took some blank tags I had leftover from last Christmas and stamped each of them with the single flower from the set in Memento Tuxedo Black ink. I coloured them once again using my alcohol markers and used a white gel pen for the highlights. I stamped the flower on some masking paper and cut it out to cover the flower while I splattered each of the tags with Iced Spruce Distress Oxide Ink and pink metallic watercolour paint. I waited for them to dry before stamping my sentiment down the side using Versafine Onyx Black ink and attached a ribbon to the top of each of them. I finished them off with the Bottle Green Nuvo Crystal drops for that extra touch!
P12 ME Heart In Bloom 2
Thanks for reading lovelies!

xo

Bumbleberry Papercrafts
Shop
Blog

Supplies

Stamps & Dies
Mama Elephant “Heart In Bloom” Stamp Set
Altenew “Cube Cover” Die

Inks
“Iced Spruce” Distress Oxide Ink

Adhesives
3M Scotch Double Sided Foam Tape

Craftin Desert Divas!, Friendship Cards, Just Because Cards, Thank You Cards, Uncategorized

Craftin Desert Divas August Release – Sneak Peek Day 2!

Hello lovelies!
August release week with Craftin Desert Divas is finally here! I know some of you have been just as excited as I am, so I’m here to showcase a card I made using the brand new adorable set Grateful Trolls and the new Hill Scene 2 stencil! I am madly in love with this set and I know all of you will be too! Make sure you click “going” to the facebook event for this release so you don’t miss out on any of the fun!
1.jpg
I started off by cutting down a panel from white card stock. I blended in clouds using the Hill Scene 2 stencil, Carved Pumpkin and Squeezed Lemonade Distress Oxide ink, changing up which side of the stencil I use each time and sometimes even flipping it over! I lightly sprayed the panel with my Distress Sprayer bottle when I had covered the entire panel and mopped up the excess using a paper towel.
2.jpg
I stamped my cute little troll using Memento Tuxedo Black ink and coloured her using my Spectrum Noir alcohol markers. I added some rosy cheeks with a pink pencil, added three little dots to each cheek using my white gelly roll pen before adding highlights to the rest of my image. Once they had dried I fussy cut my image out and set it aside for a bit.
3.jpg
I cut a strip of white card stock to fit across my panel for my sentiment and to ground my troll later on. I prepped the strip with my powder tool applicator, stamped my sentiment in Versafine Onyx Black ink, coated it in clear embossing powder and set it with my heat tool. I adhered the strip to my panel using double sided tape.
4.jpg
I adhered my troll to my panel using double sided foam tape before backing my entire panel with the same tape and adhering to my card base. I adhered a couple of sequins from the Fall Harvest mix using liquid adhesive to finish this card up and give it a little sparkle!
Grateful Trolls 1 August 2018
Thank you for stopping by lovelies! I can’t wait for you to see the rest of the release and the full sets! They’re too cute to resist! What are your thoughts on what you’ve seen this week so far?! Are you planning your ideas yet? 😉
Remember to stop by the Craftin Desert Divas Blog post to see what amazing peeks and inspiration the other DT members have in store for you! ❤

CDD-ReleaseAugust2018-Facebook-Event-Cover-Photo.png

xo

Craftin Desert Divas
Shop
CDD Sneak Peek Day 2 Blog Post!

Supplies
Links to new products will be added when they become available!
Grateful Trolls Stamp Set
Hill Scene 2 Stencil
Carved Pumpkin Distress Oxide Ink
Squeezed Lemonade Distress Oxide Ink
Memento Tuxedo Black Ink
Versafine Onyx Black Ink
Powder Tool Applicator
White Gelly Roll Medium Point Pen
Fall Harvest Sequins

♥ Please note that the links to products and the CDD shop are affiliate links. If you choose to make a purchase through these links I will receive a small commission at no extra cost to you. ♥
36901571_10160798146590271_7415108762773487616_o


Craftin Desert Divas!, Friendship Cards, Just Because Cards, Thank You Cards, Uncategorized, Watercolour Cards

Smiles Across The Miles – Craftin Desert Divas Creative Challenge!

Hey lovelies!
It’s time for another Designer Creative Challenge from Craftin Desert Divas! This time we’re all about sharing the love and sending those smiles across the miles! This is something I like to do often, growing up cards have always held a sentimental value to myself and my family members so I cherish each and every card I receive! Whether you’re sending someone a note to encourage or support them, or even just to say hi! Handmade cards can make a huge impact on those you care about, knowing somebody has taken the time to sit and create something unique just for you really is a special feeling! Today I’m sharing with you a card I made using the ‘Kindness’ and ‘Wishful Thoughts’ stamp sets as I really love using florals for these types of cards!

1.jpg
I started by prepping some watercolour paper with my EK Success powder tool applicator. I stamped my floral image using Versafine Onyx Black ink, coated it in clear embossing powder and set it using my heat tool.
2.jpg
I painted my image using watercolour paints then fussy cut it out once it was dry. I went for a super colourful look, after all we want to brighten someone’s day!
3.jpg
I cut a panel using the Crazy Stitched Frame dies from heavy weight white card before stamping some of the smaller images from the Kindness set in a random pattern using Iced Spruce Distress Oxide Ink to give it a softer look. I cut down a rectangle piece of white card and stamped my sentiment from the Wishful Thoughts set in Versafine Onyx Black ink. I drew little dashes along the border of the rectangle using my ruler and a black pen to add a little extra detail. I positioned my flowers and sentiment towards the centre of my panel and popped them up with some double sided foam tape. I adhered my entire panel to my card base using some double sided tape to finish!
IMG_1338_Fotor
Thank you for stopping by lovelies! ‘Just because’ cards are among my favourite cards to make, I’m sure I’m going to get a lot of use out of this stamp set in the future too! I hope you like what I’ve created to show you today, please be sure to stop by the Craftin Desert Divas’ blog post to see what the other DT members have created for inspiration! These talented ladies have a lot of helpful tips up their sleeves! ❤

xo

Craftin Desert Divas
Shop

Supplies
Kindness Stamp Set
Wishful Thoughts Stamp Set
Crazy Stitched Frame Dies
Versafine Onyx Black Ink
Iced Spruce Distress Oxide Ink
Powder Tool Applicator

♥ Please note that the links to products and the CDD shop are affiliate links. If you choose to make a purchase through these links I will receive a small commission. ♥

36901571_10160798146590271_7415108762773487616_o